One of my most valuable possessions is my laptop. Not only because of the monetary value attached to it but also because of the freedom it provides me. I can use my time more effectively, pursue my dreams, and communicate with the most important people in my life. Therein lies the core of this carry design.
A bag to carry my laptop.
Traveling to university, work, seeing friends, and anything involving public transport, I will take my studies. The bag I take, as a result, becomes the base of operations. But I never leave the house with just my laptop. Therefore, it had to include components to assist me through every day.
Research & Discovery
Understand the problem and the target audience. How does the user want to use the product. Analyse competitor benchmarks and trend insights.
Here are some of the parameters I would like to incorporate into the final design. As I move into my secondary research these may change.
Messenger
Messenger is generally associated with more active use, by students, professionals, and commuters. Typically with an adjustable strap that allows for cross-body wearing and a flap that folds over the top of the bag.
Adjustable Carry
Although intended for only me to use, theoretically one size shoulder strap should be sufficient, I like the option of adjustability. This theme also encapsulates a carry handle, which needs to be removable.
Magnetic Integration
Create a bold design by incorporating magnetic closures and other magnetic features.
Minimalistic
A personal garment preference for me is minimalism, especially with bags. Something that can be worn with any outfit. Dark, or less stainable, colours were also something I looked for in an everyday bag.
Water Resistant
As this bag carries my laptop and books, water resistance is important.
Internal Lining
Avoid visible seems by incorporating an inner lining. Create internal cavities to help segregate different items.
Multiple Pockets
Having a laptop in an individual pocket provides the most protection. Books also provide a beneficial uniformity that I like in a certain pocket.
Protective
Carrying a laptop and other personal belongings, the bag should have protective padding.
Sustainability
Focus on ensuring sustainable practices are used for the materials and the production of the bag.
Laptop & charger
Food & cutlery
Water bottle
Keys
Wallet
Visual diary
Calendar diary
Next looking at some of the current bag designs, to see manufactured design solutions that I could replicate in my final design.
Pencil case
Protein shaker
Loose jacket


Form study
Ochordian-style bags stood out immediately so I took note of the various details.


Internals of bags, specfically, the methods used for constructing the lining.

Examples of current magnetic integration.


Hardware
study
Define Requirements
Set goals, objectives, and deliverables. Gather constraints (eg. budget, time, technology)
Affinity Diagram
Here is an affinity diagram showcasing some important characteristics to incorporate.
Functionality
Laptop compartment
Miscellaneous compartment
Books compartment
Organisational pockets
Lunch compartment
Water bottle holder
5
5
4
2
2
3
Closure
Flap closure
Magnetic closure
Zipper closure pockets
Magnetic closure pockets
5
5
4
3
Mobility
Adjustable shoulder strap Removable shoulder strap Removable carry handle
5
3
3
Form
Minimalistic
Internal lining
Stands upright
5
4
3
Protection
Protective layers
Water-resistant
Sustainability
5
53
Essential Characteristics of Bag Design
Laptop compartment
Miscellaneous compartment
Flap closure
Adjustable shoulder strap
Minimalistic
Protective layers
Water-resistant
Ideation
Brainstorm ideas and concepts. Sketch or wireframe potential solutions.


The accordion shape stood out to me as I explored different forms.
I also begin to look into the integration of magnets. This sparks a design aesthetic - using the flap to break the bag silhouette into two, representing two magnets.


_edited_edited.png)
_edited_edited.jpg)
Concept Development
The subdivision of the compartments was finalised leading to exploration into how to construct the design.
Choose the best ideas to develop further. Refine the concept with feedback from stakeholders.
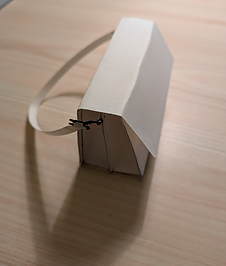
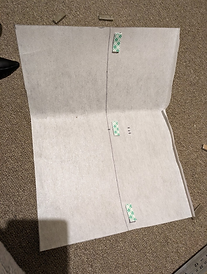
Early stage paper prototype


Here I add a design element to allow for the bag to naturally fold inward to exhaggerate the accordian style in-folds.


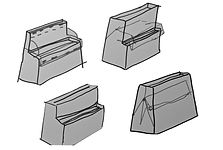
Front


Side
Isometric

By producing a pattern I was able to test this new designs feasibility. The construction of the bag would consist of two structural builds, joined, to make the bag.
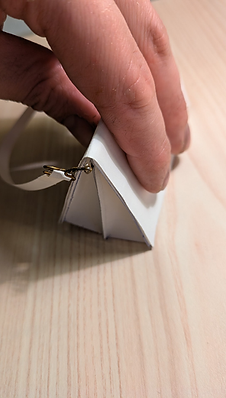
Early stage fabric prototype (1:3)
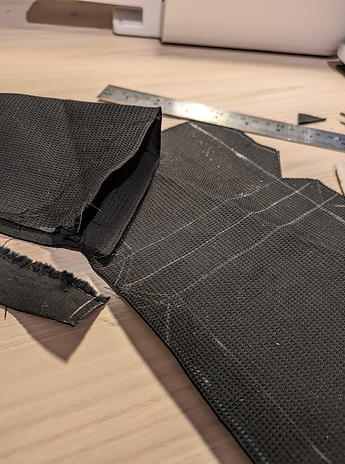

The main aim of this prototype was to test the triangular construction of the sides. It worked well.
I noticed a design flaw while testing this prototype. The way the corners converge did not work with the small square cutouts in the corner, so I will remove this feature on the next pattern.
Design
Create high-fidelity designs. Develop high-quality prototypes or mockups with high standards. Implement specific materials and finishes. The original vision must remain the same from concept to production
My next goal was to finalise the ideation by bringing dimensions to the bag. The sizing would be orientated around my laptop protective case. Additionally, my water bottle width needed to fit in the main compartment.


Laptop Case Dimension
Waterbottle Dimension


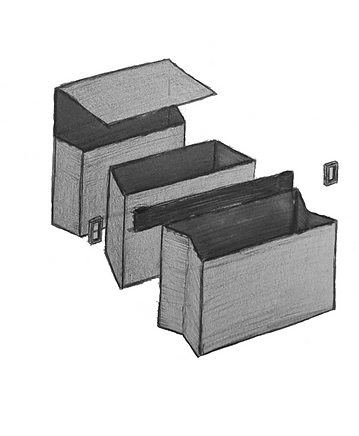
This pattern would be duplicated and sewn together to make the bag form. For the second box, a divide would be sewn in place to divide the box into two, one compartment for the laptop case, the other for my visual diaries.
Width: 250mm
Height: 340mm
Width: 100mm

Once I was ready for a working 1:1 prototype I started to plan the construction of the magnetic integration within the closure.


Final fabric prototype (1:1)
First, the two compartments were constructed. The carry strap was also sewn in between. The rigidity of my material was so low that I could not accurately test the weight distribution.
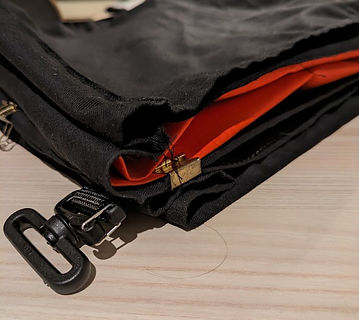

I created the internals based on the same dimensions from the outer.


The addition of the inner supported the bag, allowing the intended shape to form. The weight distribution test worked better, however, compared to Axoflux 300D, it performed inaccurately as a replication of the properties of the final material.
Creating this 1:1 prototype allowed me to figure out some construction details to incorporate into the next prototype. For example, a method for stitching the bias tape into the bag to ensure it can support the weight-bearing requirements of this build.
I was also able to test the application of the magnetic closure which worked well, however, it required more rigidity within the structure.

While creating an isometric on Illustrator, I thought of the idea for a convertible carry strap. This strap features two identical Maglockz buckles, which can be disconnected to remove a large section of the strap. Once the section is removed, the strap can be shortened and used as a handbag strap by reconnecting the opposite buckles. The strap can easily be reassembled by connecting the two buckles, allowing for a full-length carry strap when needed.


For this prototype, I was unable to get two matching Maglocks so they were the incorrect size to work compatibly, however, worked well enough as a proof of concept.
I began to further think about the internals and rationalise what I could construct with the given materials and spare scaps.


With a final design produced for the next working prototype, I began to prepare for construction by cutting all the fabric to shape and laying out the hardware.
Strap System:


Using seatbelt material supplied by ALPAKA, a red canvas material taken from an RMIT tote bag, and a shoulder pad from an old duffel bag, the soft fabrics for the strap were sorted.


ALPAKA supplied me with two Maglockz buckles, and strap adjustment hardware. Additionally, I repurposed the strap clip from a previous bag project, fulfilling all the parts required for the strap's hardware.


The last part of the strap is the connection mechanism attached to the bag. I used spare bias tape and a D-ring to facilitate the join.
Inner:


ALPAKA supplied me with a magnetic key tether, which I planned to attach to the bag using more of the scrap RMIT tote. I found a mesh fabric with an integrated zipper in my pile of scraps. Additionally, I found some blue fabric to act as a colour contrast within the cardholder I repurposed.

Using the magnetic system created during the previous prototype, and a grey ripstop supplied by ALPAKA, I had everything ready to produce the inner.
Outer:


The outer consists of two materials, Axoflux 300D, and a thick structural polyurethane fabric, both supplied by ALPAKA.
Construction:


The final product of the bag ended up being of incredible quality. Although I want to take credit, the real reason was due to the materials used. Compared to the first 1:1 prototype, this bag now feels like a completed, high-quality product.
Review & Feedback
Validate the final form by testing every feature and use case. Present the design for feedback from stakeholders. Iterate and adjust based on input.
This bag was designed for me - I was the only stakeholder. After testing, repairing, improving, and testing again, it was time to create a V2.
The first thing that failed was the D-ring. When traveling, the bag was heavily loaded, past the tensile strength capabilities of the plastic D-ring. I placed temporary ones in place, a metal carabiner this time.
The second thing that failed was the magnetic closure. The issue was the magnetic sleeve which was constructed using a thin material coming loose. The thread, holding this sleeve in place, ripped the thin material. I disassembled the bag and repaired it using a thicker material.
An issue with the prototype was the two Maglockz being two different sizes. Thankfully ALPAKA supplied more material and hardware, allowing me to correct them to one size. While I had the strap under the knife I thickened the red handle to be consistent with the rest of the strap's width dimensions.
Tested.
Here are some improvements to make: